1. Setting up the phone
You need two things: root access rights and a TUN/TAP driver. This driver creates a virtual network interface on your phone through which applications send the data. The interface encapsulates the data in DNS queries and sends them over the Wifi or mobile interface. MagicTunnel needs root access to create the virtual network interface and to reroute Internet traffic through it.
Your phone may already have root access and a TUN/TAP driver, especially if you installed alternative firmwares such as CyanogenMod or a MoDaCo custom ROM. In this case, skip to the next section.
Rooting the phone There are as many different procedures to root the phone as there are phone models. These procedures usually consist of two steps: unlocking the boot loader and installing a "superuser" app from the adb shell. Please refer to the appropriate tutorials on the Web. Below are some links. Please be aware that rooting the phone can void your warranty or break it if something goes wrong. Do it at your own risk.
Installing the TUN/TAP driver For this, you need to download the Android NDK and the sources of the Linux kernel that ships with your phone. Then, pull the configurations settings from your phone, enable the TUN/TAP driver, compile the kernel, then copy the tun.ko (the compiled driver module) to your phone. You will have to modify your phone's configuration files to load the driver at startup. You will also have to remount the phone's system partition read/write to copy the driver and modify the files. Here are some useful links:- Compiling the TUN/TAP driver for HTC Kernel Source 2.6.29
- Remounting the system partition in read/write mode.
2. Setting up a DNS server
To use MagicTunnel, you must setup a DNS server. If you already have one, skip to the next section. The DNS server can be any computer connected to the Internet and that you can control. Your home computer is perfectly suitable for this task. You must also get a domain name (or a subdomain) that you can control. There are many Web sites that propose them for free.
A.Configuring domain names
- Get a domain name for your computer and set it to point to the IP address of your computer. You can use dyndns.org or no-ip.com to get one for free. If you have a dynamic IP, these services provide you with an application that updates the domain whenever the IP address changes. In the following, we assume that your computer is identified by mycomputer.dyndns.org.
- Get a domain name for the tunnel. Go to your registrar and create a domain (or a subdomain) for the tunnel. We assume that you created a subdomain mytunnel.mydomain.org. After you created it, point its NS entry to mycomputer.dyndns.org that you set up above. This means that all queries of the form asdfasdfasdwre.mytunnel.mydomain.org will be forwarded to your own computer, on which you run the DNS tunneling server.
B.Installing the DNS server
Once you obtained a domain, download, decompress, and compile the DNS tunnel server iodine on your computer. We assume here that you run Linux. The iodine server can also run on Windows.
$ tar xzvf iodine-0.6.0-rc1-android.tar.gz
$ cd iodine-0.6.0-rc1-android
$ make
Launch the server as follows:
This command instructs the server to give to connected clients an IP address in the 192.168.233.1/24 range. iodined creates a network interface tap0 through which the Internet traffic will flow. Depending on your setup, you may need to configure the firewall to allow clients to communicate with the server and browse the Internet. The following commands show how to do that on Linux. We assume the network card connected to the Internet is eth0.
$ sudo iptables -A INPUT -p udp -m multiport --dports 53 -i eth0 -j ACCEPT
$ sudo iptables -A OUTPUT -p udp -m multiport --dports 53 -o eth0 -j ACCEPT
# Allow the connected clients to talk to the server machine
$ sudo iptables -A INPUT -i tap0 -j ACCEPT
$ sudo iptables -A OUTPUT -o tap0 -j ACCEPT
# Forward Internet traffic
$ sudo iptables -A FORWARD -i tap0 -o eth0 -m state --state NEW,ESTABLISHED,RELATED -j ACCEPT
$ sudo iptables -A FORWARD -i eth0 -o tap0 -m state --state ESTABLISHED,RELATED -j ACCEPT
$ sudo iptables -t nat -A POSTROUTING -o eth0 -j MASQUERADE
3. Installing the MagicTunnel App
If you want to install MagicTunnel from the download tab, your phone must be setup to allow installation of non-Market applications. Go to "Settings/Applications" and tick the "Unknown sources" checkbox.
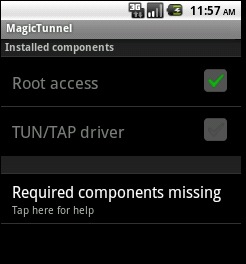
If you see the
screen on the right when you start MagicTunnel, some components
are missing. Refer to the first section on how to install them, then
start MagicTunnel again.
Note: on some phones, you may also need to install BusyBox if
installation fails.
If all components are present, you can proceed with the installation by tapping on the corresponding button. During this process, you will be requested to grant root rights for MagicTunnel. You should allow MagicTunnel to get root rights automatically, otherwise installation will fail.
Then, you will be taken to the list of available tunnels, where you have access to the following features:
- Configuration of an unlimited number of tunnels
- Quick connection to any tunnel with a single tap
- Display of the log messages produced by the DNS client to troubleshoot connectivity problems
Creating a tunnel profile
- Tap on "Add new tunnel"
- Choose an arbitrary name for your tunnel
- Set the domain to mytunnel.mydomain.org
- Fill in the iodined password that you chose previously
That's all you need.